May 18, 2020

    User administration in Microsoft Dynamics SL – part 1: creating users

     Creating Users in Dynamics SL isn’t something that is done every single day. Because of this, one cannot always recall exactly how to complete the tasks. 

    To help with this common support request, I have provided the following step-by-step guide as part 1 of our two-part User Administration Series for Dynamics SL.

    Please Note: Dynamics SL access rights are unique to every installation. There are no “pre-packaged” Groups or rights, excepting the built-in Everyone Menu Group and Administrators Group – neither of which can be altered. So, bearing these points in mind, I will be reviewing User Administration under the assumption that Access Rights are already fully established in your installation.

    User Creation in Microsoft Dynamics SL

    The following four steps outline each aspect of User creation in Dynamics SL.

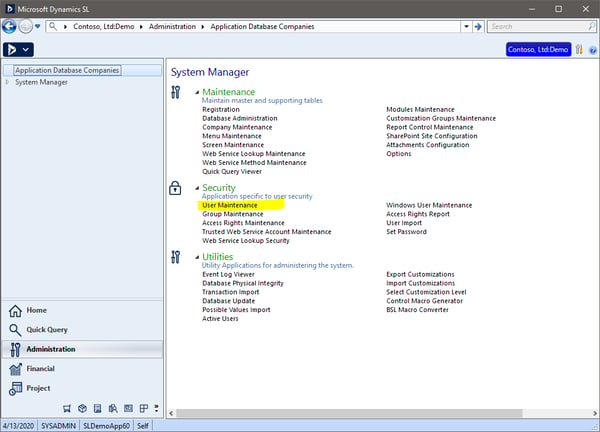
    Step 1: Log into Microsoft Dynamics SL as an SL Administrator. (The SL Sysadmin User or any User account that is a member of the built-in Administrators Group)

    Navigate to and open: Administration > System Manager > Security > User Maintenance.

    Note: If the Administration menu band is not visible, then you are likely not logged in as an Administrator.


    Microsoft Dynamics SL - Figure 1


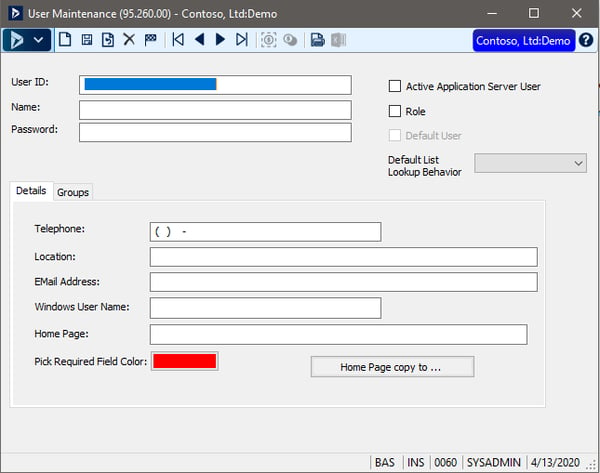
    Step 2: Complete the Header & Details section on User Maintenance.

    Defined below are all the fields on the Header & Details tab of User Maintenance. Some are required. Others are not. Be sure to read each carefully.

    To complete Header & Details tab:

    1. User ID – Distinct to each System Database. Choose a format that fits your internal User naming conventions. I typically advise replicating the User’s Windows User ID to keep things consistent.
    2. Name – Populate with their first and last name.
    3. Password – This field can be left blank if using Windows (Active Directory) Authenticated security. If you populate the Password when using Windows Authentication, the User will be challenged for a password upon login to SL.
    4. Telephone – Enter the User’s telephone number. This field is optional. It does appear on the Active Users screen (98.210.00) and can be handy along with other similar details to follow.
    5. Location – Free form entry; where the User is. This field is optional.
    6. Email Address – Enter their email address. This field is optional.
    7. Windows User Name – Required if using Windows Authentication. If SL is not configured for Windows Authentication, the field will not be visible on the form. If visible, enter the Windows User Name in the following format: Domain\UserName. If entered incorrectly, it will immediately ERROR when you tab off the field.
    8. Home Page – URL to display on the User’s SL home screen. This field is optional.
    9. Pick Required Field Color – The color is used to indicate required fields throughout the system. The default is red, though some Users prefer a less severe color such as orange or purple. This is where you would change/set it.
    10. Active Application Server User – Check this box if the User should be allowed to submit Application Server requests. You will want to verify that the User has sufficient rights to the Application Server Submit screen (96.020.00), if leveraged.
    11. Role – If the “User” is to be a role, then click this option. Note that this is not common and not necessary in the context of this document.
    12. Default User - This inactive check box indicates if the record is a User’s default SL account associated with the defined Windows User. It is not an interactive field. Information/Display only.
    13. Default List Lookup Behavior – This Combo Box allows you to set how you want to leverage the Lookup filter when evaluating the list of Users from other entry screen.


    Microsoft Dynamics SL - User Maintenance - Figure 2


    Once completed, save the configurations by pressing the Save button on the tool bar or by typing CTRL+S. This creates the new User record in SL. Assuming that Windows Authentication is being leveraged, if you get an error in a white box and a bunch of error verbiage, it is likely your linked SQL Windows User Account does not have adequate permissions to complete this task, despite being in the SL Administrators Group. This is usually the result of manual security changes in SQL to override default permissions “set” by SL when a User is added to the Administrators Group.

    Step 3: Assign Groups to the new account via the Groups Tab on User Maintenance.

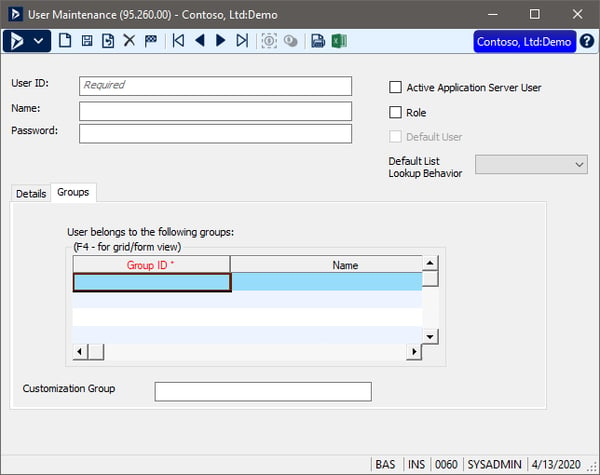
    By completing this tab, Access Rights are assigned to the new User account. Groups should already be designed and setup in Dynamics SL to reflect valid User functions within the organization. As such, I often recommend copying the Groups of an existing User with similar job functions to the new User. If the User is filling a new role, then deeper consideration and review will be required regarding Group assignments or new Access Rights setup.

    To complete the Groups tab:

    1. Select the Groups tab.
    2. Click under the Group ID column and press the F3 Key to display a list of pre-defined Access Rights Groups. Select the appropriate Groups for the new User; one Group per record in the Groups grid. I recommend that all Users be a member of the “EVERYONE” group. This allows them to see all standard menu items that they are entitled to via their Access Rights. *TIP: You can copy Groups using CTRL+C from one User record and paste to another using CRTL+V.
    3. Customization Group – This field identifies a group assignment for Users for whom certain customizations apply. This Group must already be set up in the Customization Group Maintenance screen (91.270.00), if being leveraged.


    Microsoft Dynamics SL - User Maintenance - Figure 3


    Once completed, save the configurations by pressing the Save button on the tool bar or by typing CTRL+S. This commits the User’s settings to SL.

    Step 4: Test their Access Rights.

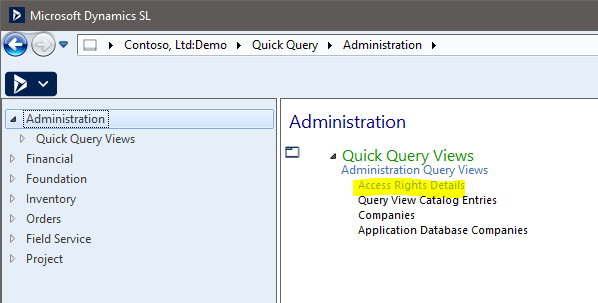
    There are times when screens or processes may not work as expected. To determine why, I recommend checking the Group assignments to ensure they fit the User’s role. To get more details on what each Group is configured to do, use the Access Rights Details - Quick Query report. It can be found under Quick Query > Administration > Access Rights Details. When filtering it on “Relationship” it will give the details on each Group’s Access Rights in SL. Filtering on the User will show their full Access Rights report. This will help in determining if there are holes in their permissions.


    Microsoft Dynamics SL - Administration - Figure 3


    Once the User reports back that all works well, you have successfully completed the creation of a new User in Dynamics SL.

    That completes Part 1 of User Administration in Dynamics SL. Hopefully this guidance will empower you to take command of those tasks with confidence. If at any point you find that the directions or recommendations don’t quite fit your organization’s specific needs or you have questions regarding nuances not covered here, please do not hesitate to reach out to Enavate Customer Care for more guidance and support!

    In Part 2 of this series, we will cover updating and deleting User accounts in Dynamics SL. There is much to consider with each scenario, so be sure to subscribe to our blog so you don’t miss it when it posts.


    Looking for help from Dynamics experts? Enavate is a Microsoft Gold Partner with a team of 300 specialists. We implement and support Dynamics and guide over 1,800 organizations with best practices.

    Speak with one of our experts

    About the Author

    Paulette-St-George-for-Blog

    Paulette St George is a Senior Technical Professional, Customer Support, for Enavate Managed Services, a DXC Services Partner. She has more than 25 years of experience in back office technology with a primary focus in Microsoft Dynamics SL and related solutions. She has served as a solution architect and designer, as well as developer. Currently she functions as a Senior Technical Consultant for ENAVATE by supporting Microsoft Dynamics, Microsoft SQL Server as well as varied Procurement solutions and Business Intelligence reporting technologies. She enjoys spending time cooking and creating healthy, clean and exciting meals, and spends much of her free time reading and researching many different topics of interest from Astronomy, Food Science and even Homeopathic Medicine. She lives in Southern California splitting her time between Orange County and Big Bear Mountain, enjoying the beautiful and varied weather SoCal has to offer.


    Paulette St George

    Paulette St George is a Senior Technical Professional, Customer Support, for Enavate Managed Services, a DXC Services Partner. She has more than 25 years of experience in back office technology with a primary focus in Microsoft Dynamics SL and related solutions. She has served as a solution architect and designer, as well as developer. Currently she functions as a Senior Technical Consultant for Enavate by supporting Microsoft Dynamics, Microsoft SQL Server as well as varied Procurement solutions and Business Intelligence reporting technologies. She enjoys spending time cooking and creating healthy, clean and exciting meals, and spends much of her free time reading and researching many different topics of interest from Astronomy, Food Science and even Homeopathic Medicine. She lives in Southern California splitting her time between Orange County and Big Bear Mountain, enjoying the beautiful and varied weather SoCal has to offer.

    Enavate Recent Posts

    December 19, 2024

    10 Reasons to Partner with Enavate for Your Next Tech Project

    Whether you’re looking to make the leap to the Cloud or upgrade your ERP solution, one of the first things you should do is look for an implementation partner to help guide... Read More
    December 19, 2024

    How Do Microsoft Dynamics 365 Business Central and Oracle NetSuite Compare? 

    Microsoft and Oracle have been computing giants for decades, so it’s no surprise that both companies offer ERP solutions that are listed as industry leaders in the most... Read More
    December 12, 2024

    10 Tips for a Successful Technology Implementation 

    Everyone knows what Neil Armstrong said when he walked on the moon. Here’s a less famous Armstrong quote from before he got there: “I think we’re going to the moon because... Read More

    Subscribe to Receive Email Updates